Aladin® AIR X - DIY battery exchangeThe information on this site is for personal use only and is exclusively performed at your own risk without liability of this site, contributors, associates, and/or site operator. This information is not allowed for use in any commercial form or in any other way. For a successful DIY battery change in an Aladin® dive computer, you will need to have a solid working experience with soldering/desoldering and a general mechanical proficiency to access the battery. TEXT IS UDER CONSTRUCTION NOW! Excuse my English please.... 
WARNING! Aladin® dive computers are oil-filled. Do not discard the oil as it must be reused when the battery change is completed. You must carefully extract and store the oil. Use of rubber gloves is reccomended !Spare oil You can ask here - www.cermaks.com
The AirX's cover is glued-on and the glue is hard & needs to be carefully scrape out . After the battery is changed it’s necessary to re-glue the cover & re-fill the unit with oil. All of this is difficult.
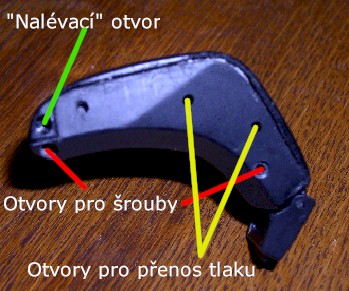
When ready to open the case, if it is very stuck,you can try and lever it gently while using some heat. (@100°C max! Hair dryer / heat gun on very low setting) Green - Filling hole. Through this hole you can refill oil (if it is not blocked inside by glue) This hole is covered by a screw with Oring. Yellow - Holes for sensors. Ambient pressure is transmitted to sensors inside through this holes. DO NOT BLOCK. Red - Two locking screws. These screws hold the glued cover. Left screw is usually very tight. You can carefully try a little heat - carefully! For example, touch it with the tip of a hot soldering iron to heat it up and break the seal. 
Green - You need to scrape out all the glue. Yellow - Do NOT scrape out ! |